Managing My Account Settings
You can view and update your account settings, including your email, name, and phone number on the My Account tab. Additionally, you can
You can also reference important information, including your Account Type and the fields detailed below.
| Field | Description |
|---|---|
| Shared Secret for MFA |
Static code used for setting up multi-factor authentication on the Google Authenticator application the first time you login to ThreatStream using MFA. To view the scannable QR code that serves the same purpose, click Show QRCode. This field is only displayed if MFA is enabled for your organization. |
| API Key |
Key used for authentication when you access ThreatStream from outside the user interface, such as through API calls or ThreatStream Integrator. Click Reveal to show your API key. Note: Read Only users can view their API Key only if the Show API Key for Users permission is enabled for them on the User Admin tab. Refer to Managing Organization Users for details.
|
| Last API Check-in Date | Time of your most recent ThreatStream login. |
To set a default landing page:
- In the bottom-left corner of the side navigation panel, click
 > ThreatStream and then click My Account.
 - Enter your current password in the corresponding field.
- Select the landing page of the application of your interest. The following default landing pages are available for selection: Platform Dashboard, ThreatStream, Security Analytics, and Search. Note: Active subscription to Anomali Security Analytics is required to set Security Analytics as your default landing page.
- Click Save Changes.
After saving your changes, you are logged out of ThreatStream. The next time you log in to your ThreatStream account, the selected landing page will be displayed.
To update your contact information:
- In the bottom-left corner of the side navigation panel, click > ThreatStream and then click My Account.
- Enter your current password in the corresponding field.
- Make required changes to the Email, Name, or Phone fields.
- Click Save Changes.
After saving your changes, you are logged out of ThreatStream. Changes to your contact information are reflected on the My Account tab the next time you login to ThreatStream.
Receiving Notifications from ThreatStream
From the My Account tab in ThreatStream Settings, ThreatStream enables you to customize the email and in-app notifications you receive. These notifications keep you up to date with the latest threat intelligence impacting your organization. Some notifications are only available to Org Admins.
Refer to the table below for specifics on available notifications that you can enable.
| Email Notification | Description | Available to |
|---|---|---|
| Threat Models | ||
| Threat Model Creation | Sends immediate email or in app notifications every time a threat model entity is created. | All users |
| Threat Model Update | Sends immediate email or in app notifications every time a threat model entity is updated. | All users |
| Threat Model Daily Digest | Sends daily email summaries of threat model entities created during the day. | All users |
| Trusted Circles | ||
| Trusted Circles | Sends immediate email notifications when organizations join or leave your trusted circles. | All users |
| Rules | ||
| Rules Matches |
Sends immediate email notifications when keywords that your organization has configured in rules matches new intelligence. See Rules for more information. |
All users |
| Rules Matches Digest |
Sends an hourly email summary of all keywords configured in rules that have matched new intelligence in the last hour. See Rules for more information. |
All users |
| Disabled Rule Notifications | Sends immediate email notifications when rules are disabled. See Re-Enabling Disabled Rules for details on disabled rules. By default, the setting is disabled. |
Org Admins |
| Imports | ||
| Import Session Creation | Sends immediate email notifications when intelligence is imported. | Users with Approve Intel privileges only |
| Import Session Hourly Digest | Sends hourly email summaries of all imported intelligence from the past hour. | Users with Approve Intel privileges only |
| Investigations | ||
| When any investigation is created |
Sends immediate email or in app notifications when a new investigation is created in your organization. Email notifications are sent to all users who have subscribed to receive email notifications except for the user who took the action. |
All users |
| When any task is created | Sends immediate email or in app notifications when investigation tasks are created. Email notifications are sent to all users who have subscribed to receive email notifications except for the user who took the action. | All users |
| When an investigation is assigned to me or my workgroup | Sends immediate email or in app notifications when an investigation is assigned to you. | All users |
| When a task is assigned to me or my workgroup | Sends immediate email or in app notifications when an investigation task is assigned to you. | All users |
| When an investigation is updated by another user | Sends immediate email or in app notifications when a user in your organization updates an investigation. | All users |
| When a task is updated by another user | Sends immediate email or in app notifications when investigation tasks are updated by users in your organization. | All users |
| APP Store | ||
| When a feed has errors | Sends immediate email or in app notifications when a feed is down. | Org Admins |
| When a feed has no data | Sends immediate email or in app notifications when a feed has no data. | Org Admins |
To manage your email notifications:
- In the bottom-left corner of the side navigation panel, click
 > ThreatStream and then click My Account.
 -
Scroll down to the Notifications section.
-
Locate the email notification to which you want to subscribe or unsubscribe.
-
To subscribe, select the notification interval corresponding to the notification from the drop down menu.
To unsubscribe, select Unsubscribe from the drop-down list.
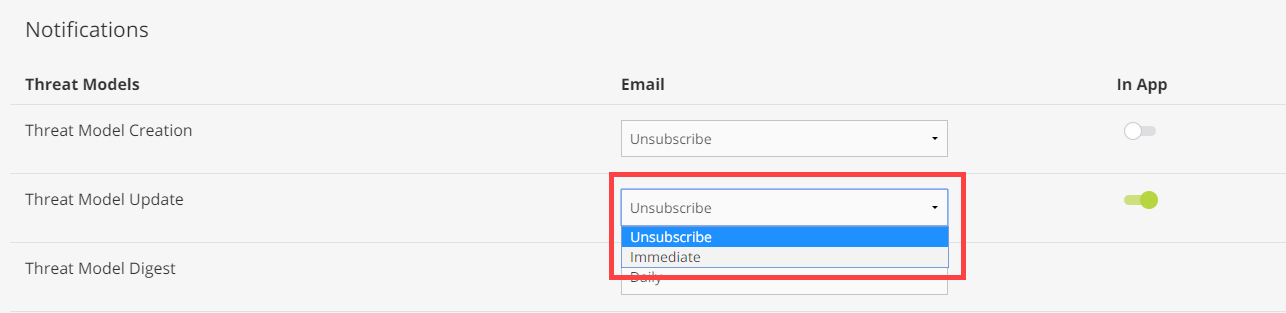
Updates are saved automatically.
To manage in-app notifications:
- In the bottom-left corner of the side navigation panel, click
 > ThreatStream and then click My Account.
 -
Scroll down to the Notifications section.
-
Locate the in-app notification to which you want to subscribe or unsubscribe.
-
To subscribe, move the slider to the right position. The slider turns green upon subscription.
To unsubscribe, move the slider to the left position. The slider turns gray upon unsubscribing.
Note: If a slider is not displayed in the In App column, in-app notifications are not available for the event.
Updates are saved automatically.